Friday, September 28, 2012

Our Favorite FUN Books


Do you have a favorite book that just makes you want to curl up on the couch, grab a blanket, a forbidden treat, and just dive in to the story and tune out the world? There's something about an entertaining read that is delicious to the soul. Pure entertainment, here are a few of our favorite "guilty pleasures":


Maren: I'm a big mystery buff myself. Especially the English ones. What is it about a cozy English mystery that makes it so captivating? I don't know but they are my fave. So in being truly honest to my favorite guilty pleasure I have to say the Agatha Raisin series by M.C. Beaton. Now I will admit this series is not one I would recommend to my mother per se. There is some sleazery every now and then but the main character Agatha Raisin is such a gem. She's a middle aged, wealthy, retired business woman who is as friendly as a rotweiler but hides a vulnerable and sensitive heart. The scrapes she gets into and how she works herself out of them are hilarious. If you don't mind a little PG in your books definitely pick up these books.


Jenn: Our family is getting ready for a trip to Brazil and as I have been making the packing list the memories of our last trip have come flooding back. One of those great memories is reading on the beach, and the series I was reading at the time was Fablehaven by Brandon Mull. It was such a fun read, full of mystery and magic and the best part about it was that it never got too dark or scary. There are some fun twists in there that you would never expect and every chapter leaves you wanting more! It was totally  worth the teasing I got from my husband and his brothers for being the only nerd on the beach with a book! 


Jan:  My favorite "guilty pleasure" would be The Best of Times by Anita Stansfield.  It is actually a five book series: A Far, Far Better Place, A Loving Heart, Every Graceful Fancy, and Tranquil Light.  It takes place in a bed and breakfast inn located in Montana. (Don't you love the porch)  It is a perfect romance with adventure, adversity, mystery, sorrow, hope and love. Each book has its own story yet all of the characters have connection with the Dickensian Inn and the main character Chas and Jackson.  It is just one of those series that you get involved with the characters lives as if they were family.  It is a series you can reread over and over again.   


Lauralee: I have to admit my guilty pleasure when it comes to reading is usually in magazine form. I am very much a visual person and love to thumb through design magazines, look at the pictures in National Geographic or Architectural Digest magazines, and get a quick read from articles in Reader's Digest. Now, if we are talking really guilty pleasures, I have to admit I get a kick out of gossip magazines like People (don't judge haha).


Nancy: Pure decadence for me is reading in bed late into the night while everyone else in the house is sound asleep. Is it ever my guilty pleasure :). 
 I am just wishing this was my bed and those books were: Jane Eyre by Charlotte Bronte; The Hiding Place by Corrie Ten Boom; The Help by Kathryn Stockett; Mrs. Mike by Benedict & Nancy Freedman; The Kite Runner and A Thousand Splendid Suns by Khaled Hosseini; The Book Thief by Marcus Zusak; The Secret Garden by Frances Hodgson Burnett; Anne of Green Gables by L.M. Montgomery; Tale of Two Cities by Charles Dickens; and of course the Twilight series by Stephenie Meyer, and the Harry Potter series by J.K. Rowling. Whew.

All these books have made me laugh, weep, feel, learn, and given me great adventure.I know I'm a book worm because I think good stories are like being wrapped up in a comfy blanket and tasting something better than cinnamon rolls or chocolate.

So these are our favorite guilty reads, what are yours?
  Pin It

Thursday, September 27, 2012

Twirly Girl Skirts - Part 1

Three fun, fast and easy skirts that will leave your little girl twirling until she can't twirl anymore!


#1 - The tutu


Two of my little girls' favorite things to do around the house are to dress up and to twirl. This has given me an excuse to do one of my favorite things...sew up some cute skirts! The first one I made is one that my amazing neighbor showed me how to do this summer. It is a fun little tutu made out of tulle and can be as fluffy and colorful as you want to make it. It is so simple, taking just an hour or less to make, and your little princess will adore it!


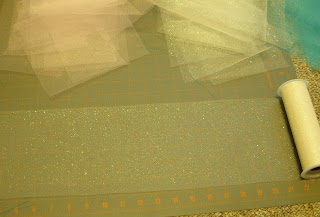
Start out by choosing the colors you want your skirt to be. You can buy the tulle on a roll like these, making it easier to cut or by the yard which is fine too.


To determine how long you need to cut your strips, take the measurement from the waist to however long  you want the skirt to be, then add four inches. These strips are 6" wide which is about perfect.


Measure the waist and then cut the elastic one inch less than that. Overlap the ends one half inch and sew them together.


Find a stool or chair that you can tip upside down to stretch your elastic around.


Take a strip of tulle and make a V with it on the outside of the elastic.


Take hold of the ends of the tulle, pull it around the back side of the elastic and then loop it through the bottom of the V.


You can tighten it as much as you want. The fluffier and "twirlier" you want your skirt to be, the more tulle you will need to put on your skirt. I used 16 strips each of three different colors for a 12 - 18 month size and it was really full. 


This is a perfect addition to a Halloween costume for little fairies, witches, princesses,  and even glamorous little pumkins and ghosts! Hope you have as much fun as I did making this little tutu and more importantly that the wearer of it gets to twirl her little heart out!
 -Jenn

Pin It

Wednesday, September 26, 2012

How to Make Soccer Ball Cookies


My kids and I found a random bake shop as we were driving through a random town. I never pass up random bake shops. Ever. So we went in. They had scrumptious and beautiful desserts, but when I saw they had soccer ball cookies that were $4. 50 each, I wished we'd never entered the place. I knew those cookies were exactly what my kids were going to want. I was right, surprise :).

Since cute cookies are dear to my heart, I bought ONE for them to split.  I looked at the cookie and realized I could probably make the whole soccer team a cookie for the same price I'd payed for one. Sure enough!! (Well, pretty close). Here's how: 

Ingredients and Items Needed:
Sugar Cookies (see below)
1 bag powdered sugar
Milk
Light corn syrup
clear extract
black gel food coloring
food paint brush
food writer marker or exactoknife
piping bags
tips: sizes 4 or 5 and 2

1. First make the cookies several days ahead. Either use your favorite sugar cookie recipe, or use this one from Our Best Bites.  It's so yummy and keeps it's shape well.  Cut balls out with a 6 inch circle cookie cutter.
 
2. Freeze the cookies overnight, or leave them in an airtight container for a few days. Seriously, this seems to make these cookies taste even better. Weird, but true. This also makes it so they don't fall apart with the 2 layers of frosting that will come.

3. Next, make Glace Icing.(adapted from recipegirl)
 (Recipe girl has an amazing soccer cookie tutorial for a more patient and meticulous mom. These are a bit simpler. I love this icing from her blog.)
1 bag (or 2 pounds powdered sugar)
1/2 Cup + 4 Tablespoons milk
1/2 Cup + 4 Tablespoons light corn syrup
4 teaspoons clear extract (such as Wilton brand)

Mix sugar and milk together. Add corn syrup and stir until just combined. Add extract. Mix.

  Keep in a tight airtight container until ready for use. If not, it will turn to a cement like substance.


4. Frost the cookies:

Use a size 3 or 4 tip and outline the cookie. Remember it's OK if it's not a perfect circle. Kids will think it's cool even if your hand is not totally steady (as seen above :)).  Outline all the cookies. This gives time for the icing circle to harden just a bit and act as a dam to the icing in the middle.

5. Using the same or bigger tip, start filling in the cookie. Only "scribble" with the icing, as pictured above. Then use a food paintbrush or small spoon to fill in the gaps.


6.  Let the icing dry for 10-12 hours.

7. Save the rest of the icing in an airtight , and again, I mean very tight container.

8. Find a pentagon shape. I googled "pentagon" then traced it right off of my computer monitor, and copied it on to card stock. (It wasn't until I made these cookies that I realized that the shape on soccer balls is a pentagon, not a hexagon!)

9. With a food writer marker, or an exacto knife, trace your pentagon shape on to each cookie.  Remember pentagon shapes are not equal on every side, so don't freak out if it seems to look funny at first. Either trace the pentagon in the middle or a little off center- whichever you prefer.


10.  Then  get out the icing which has been in an air tight container and pour about 1/2 of a bottle of black gel food coloring into the white icing. Stir very well.
Put the icing in a bag with a #2 tip.

11. Trace the pentagon with the black icing.  Then draw lines from the points of the pentagon to the edge of the cookie. Then add triangles to the edge of the line... or make part of a hexagon shape.Like so...

seriously, just free hand it-no big deal  if a line's a centimeter off.

12. Add a little bit of black frosting to the outlined triangles and hexagons.  Then use a paint brush or tiny spoon to spread the frosting in the shapes.

13. Outline the whole cookie.

14. Let the frosting dry for at least 8 hours, but 10 is better.

15. Pack them pretty  because these cookies are a process!! Extra packaging shows people that Oh, are they ever lucky.


I made these for my daughter's soccer team, and even got huge hugs and smiles all around. Totally worth the time.

These cookies not only look cute, but they seriously taste good too. My kids even said they tasted waaay better than the ONE we bought at that random bake shop. YES!! 

 XO,

Nancy

Linking To:  Weekend Wrap Up Party   Tidy Mom   Whipperberry   Thirty Handmade Days   The Best Blog Recipes   Lady Bird Lane   Six Sisters' Stuff   Family Fun Archives
One Artsy Mama
Or So She Says    The Gingerbread Blog   Be DIfferent Act Normal   Too Much Time on my Hands
It's Overflowing
Pin It

Tuesday, September 25, 2012

Pork Apple Cider Soup

It's that time of year when you can find all sorts of beautiful fruit and veggies. The weather is getting cooler, and the leaves are starting to change color!  It's the perfect time to get out your favorite soup recipes. This is one of mine (I've adapted it from one that I discovered in a BHG magazine):


Ingredients:
- 2 lbs. boneless pork                                                            - 4 cups apple cider or apple juice                                    
- 4 medium granny smith apples                                             - 1/4 tsp. salt             
- 1 TBS. cooking oil                                                              - 1 tsp. cinnamon
- Large onion                                                                        - 1 cup chopped carrots
- 2 tsp. curry powder                                                            - 1 butternut squash seeded and cubed
- 1 14oz. can chicken broth                        
- 2 bouillon cubes


Directions:


1. Cut pork into cubes
2. Peel, core and chop 2 apples and set aside
3. In a 4qt. pan brown the pork in oil, add chopped apples, diced onion and  
    curry powder


4. Add broth, cider/juice, bouillon cubes and salt and pepper to large pot
5. Bring to boil, reduce heat and let simmer
6. Add chopped carrots and return to boil
7. Reduce heat and stir occasionally (you want the carrots to be soft at this point)
8. Peel, core and chop the remaining apples 
9. Add the remaining apples, squash, and  the other contents from the pan to the       pot and cook until tender
10. Add cinnamon. I like to add more curry at this point too.
11. Garnish with orange zest and sour cream.


Not only does this soup taste savory and sweet, but it makes your home smell the same way!

Enjoy!
Lauralee

Pin It

Monday, September 24, 2012

10 ways to use your Veggie Tray

"DON'T EAT YOUR VEGGIES" said no mother ever. 
BUT, today this mother is showing you 10 other ways to use your veggie tray.


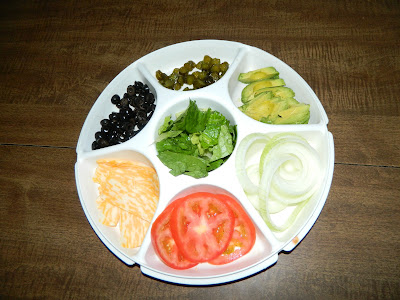
 One day I was making Hawaiian Haystacks for dinner and I was getting annoyed (knowing I was the one on dish duty) at how many bowls I was using for all the toppings.  I was looking around the kitchen and saw my veggie tray and suddenly one of those "AH HA" moments came.  Since then I have started using my veggie tray for many things other than veggies. Here is my top ten things
I do with my veggie tray.

1. Hawaiian Haystacks

2. Taco Salad Toppings

3.  Homemade Pizza Toppings
  
4. After school Snacks


5.  Movie Night Treats
Small bags in the middle
to put treats in while watching a movie.

6.  Omelets
This is one of my girls favorite meals to cook. 
They mix their eggs in a bowl and add toppings.
Pour in pan and flip. YUM!
7. Fruit Tray with Fruit Dip

8. Subs or Hamburgers
I hate when pickle juice or tomatoe juice gets on my lettuce
so this is a perfect way to divide.

9.  Sorting Colors
You could also sort shapes and numbers.
 
10.  Counting or Sorting money
We played a game this summer where you chose a piece of paper
with a dollar amount on it and then you matched the amount on the paper with money from the tray.


Pin It

Friday, September 21, 2012

Friday Forum

I       N       S       P       I       R       E


Remember when you listened to a song, read an amazing quote or heard about someones personal triumph in a challenging situation and you just feel inspired.  Our book review this week are books that have inspired us!  We would like to share what has inspired us on our journey through life and we can't wait to hear what books have inspired you? 


Nancy: Definitely my favorite inspirational books are, I am a Mother by Jane Clayson Johnson (former news network correspondent), and the Peacegiver by James Ferrill.


I have read The Peacegiver more than almost any other book. It teaches very profound and personal lessons about relationships, love, peace, and forgiveness. One of my children is named Abigail because of this book. Read it and find out why :).

Motherhood is often overlooked or seen as unessential, but I am a Mother illustrates through words how crucial motherhood truly is. Jane Clayson Johnson teaches all mothers, both those who "work" and those who "stay at home", the importance of their role. It is a powerful and validating book for all women.


 Jan: My favorite inspirational book would be Life’s Makeover by Cheryl Richardson.  It is 52 practical and inspiring ways to improve your life one week at a time.”   Several months before my mom passed away I was living in her home taking care of her when I found this book on her shelf.  The emotional and physical stress was immense at this time.  I remember at the time feeling like I was missing the joy in my life.  I had a 4 year old and a 1 year old and a very busy husband who was gone a lot with work and church callings.  I could feel myself reaching a breaking point.  I started reading this book and beginning the weekly goals and challenges.  I didn’t make it more than a few weeks when my mom was put in the hospital and my life turned upside down.  She came home with more health problems as well as no desire to keep living.  I put the book away for awhile and then didn’t pick it up again until several months after my mom had died.  This book helped me learn so much about taking care of myself, getting rid of clutter in my life, getting rid of the negative thoughts in my head and to truly change my life.  The back of the book states this, “Be prepared for your life to unfold in wonderful ways.  As you clean up the clutter, reconnect with your inner wisdom, strengthen your character, and take on the challenges of high-quality living, you’ll find that the lost parts of yourself start to come together to form a pretty amazing life!”  This is a great book to read with a friends or book club.  Cheryl Richardson suggest to find friends to support you in your life makeover.  Following the action challenges each were amazing to me how you can change your life and live a life of joy and happiness.  It is so helpful for me to go back and read the journal that I wrote with this book and to also to take the action challenges and keep improving.  


Jenn: I also had two books come to mind, You Are Special by Max Lucado and.... The Peacegiver! Nancy was very possibly my inspiration for reading The Peacegiver and I do agree that it is such a great book. Even though You are Special is a children's book, it has helped me many times in many situations. It has a great message of not worrying about what people think about you and that what really matters is the opinion of those who love you, which in this case is "the creator."


Maren: This weeks book post led to a really embarassing revelation about myself. Turns out most of the books I read are not that inspirational! Mostly just for pure entertainment! So I searched my bookcase and my memory and I remembered The Diary of Anne Frank  which I have read a bunch of times. This book is inspirational to me because of her courage and strength in a time of such hatred and sadness. Whenever I read it I am reminded that no matter what situation I am in I can still be grateful for the things that are right in my life. 
Lauralee: There are so many inspirational books out there! I was trying to brainstorm and come up with some that aren't the usual Wayne Dyer,or Robert Kiyosaki types (although good reads). That is when I realized that I am reading a new one right now! If you are not familiar with Clay Christensen this book will give you an insight into how his mind works. It is based off of a speech he gave to a graduating class at Harvard's Business school. He takes his innovative business principles and applies them to find happiness in all aspects of life. I think you will agree that this book is chuck full of wisdom and inspiration. You can also check out his speech on TED here: http://www.youtube.com/watch?v=tvos4nORf_Y


 What book inspires you? 

Pin It

Thursday, September 20, 2012

Fall Harvest Wreath


So I hate to be the bearer of bad news but lets face it, there is a dramatic increase of school buses on the roads, outside at night is not deliciously warm and there is a suspicious amount of yellow and red on the surrounding flora and fauna. Fall is here. Let's all take a moment of silence to mourn the death of summer. Done? Ok deep breaths. Let's not think about snow drifts and shoveling but focus on the positive. Darling fall decorations!!!!


I recently purchased a couple wreath forms at my favorite craft store Le Industrie de Deseret (it's fancy) and I have been eager to make a harvest wreath. Now bear in mind I have never made a wreath like this before so if you're saying to yourself "that looks like my grandma made it in homemaking" it's true and don't worry yours will turn out better.

I went to Tai Pan and Walmart to find my leaf stems, cute little pumpkins, gourds, ribbon, cheapy scarecrow and anything else that looked fun.


I cut the branches with about 3 inches of stem left on them and wrapped them around the frame securing them with twine. With each branch addition I tucked the stem into the previous branch so it would hide the ugly green plastic a little bit. 


After wrapping all the branches around the frame I grabbed my gold glitter glue and traced the lines on the gourds and pumpkins just to add a little pop of glittery goodness. The pinecones got the same treatment but just on the tips of the needles (?). After those dried I glued them all around the frame with a glue gun. You can put a few of them in a little cluster if that suits your eye better. 
To cover up any bare spots I glued leaves here and there until I was satisfied and that was it! I was surprised how relatively easy it was and pretty cheap too when you consider a cute wreath can put you back from $20 to $200 for a really good one. Give yourself a chance to experiment and have fun!

~Maren


Pin It

Wednesday, September 19, 2012

Doll Stroller Re-made


Something better than a brand new toy.... keeping your favorite one around for a long long time!


Every so often we get lucky enough to find a toy for our two year old that she loves enough to play with more than just a couple of times. This doll stroller happens to be one of those toys, and it has been used, loved and played with so much that it turned into this:


The other day she was pushing it around the house getting so upset because every time we buckled her baby in she fell right back out. I decided that this was a toy worth salvaging since it is one that keeps her happy on a daily basis.

Here is just a quick idea of how to take something you, your child or someone else in your life, love and give it a new life to be enjoyed a lot longer! Additionally, it is always nice to have a free pattern for these things!


First, take a lot of pictures of the item (whether it be a toy, clothing, furniture or anything else that can be taken apart and sewn back together) you are taking apart so that you will know exactly how to put it back together again.

Take your seam ripper and carefully unpick all of the places that have been sewn together.


Lay the old pieces on top of the fabric, pin them on and cut out the new pieces.


Cut any tapes, bindings, elastic or other materials used on your original piece. Now for the fun part of sewing it all back together!


There was one happy little girl when she woke up from her nap to a doll stroller that actually kept her doll in it the whole time she was pushing it around. So when you see those rips and tares, do not fret! In the case of this stroller, the original fabric was very thin so to up the strength and longevity I bought a home decor weight fabric.

This is a tip that can work on so many of your favorite things. It really is quite easy since you don't have to do any guessing and you already know how the finished product will be! So instead of throwing away that shirt or toy that you really love, grab some material and get to work!

Have fun!
Jenn

Pin It
Related Posts Plugin for WordPress, Blogger...