Showing posts with label Christmas- food. Show all posts

Monday, December 23, 2013

Hot Fudge Sauce (aka.. the greatest neighbor Christmas gift EVER)


Saying I love hot fudge is the understatement of the century! Seriously, there are no words to describe the pleasure I feel taking spoonfuls of it out if the jar (hot OR cold :))! I love it on ice cream, cheesecake, crepes, in milk or hot chocolate...and just about any other way (ok, except perhaps on vegetables).  I'm so lucky that one of the reasons my husband loves me is that he thinks it's extremely funny to watch how much I adore eating dessert.  Uh huh, this one REALLY makes him fall in love with me because I don't think I could adore hot fudge any more than I do.

I could eat it any time of day, any time of year, or wherever I am on the planet.

This year, I decided to make it for my neighborhood Christmas gifts. It's by FAR my very favorite neighborhood Christmas gift I've EVER given!!! Here's why:
-Inexpensive
-Amazingly delicious
-Won't go bad if it's not eaten within 3 days
- 3 week life span
-It WILL be eaten... no one can throw it away
-So many uses for it
-quick and easy to make
-Not a common neighborhood gift
-I've got a free tag with directions already done for you


So, if you've already given your neighborhood gifts this year, here's something to think about for next year!
If you're not doing any neighborhood gifts this year, good for you! Some years it's SO MUCH better that way (See my thoughts on that HERE)!
 If you haven't done them yet, and need a quick, great, and inexpensive gift, lucky you, here it is!

Even if it's not Christmas time, make it!

Ingredients:
  • 10 ounces semisweet chocolate, chopped
  • 1/3 cup sifted cocoa powder, Dutch process or regular (the flavor will be more decadent, deep with the Dutch process)
  • 1/2 cup granulated sugar
  • 3/4 cup light corn syrup
  • 1/3 cup heavy cream
  • pinch table salt
  • 1/3 cup water
  • 1 teaspoon vanilla extract
  • 3 tablespoons butter, cut into pieces

Directions:

1. Sift the cocoa powder. Seriously. If you don't, there will be clumps in the hot fudge!!

2. In a microwave safe bowl, melt the chocolate in 30 second intervals. Stir in between, until the chocolate is smooth.
Whisk the cocoa powder into the melted chocolate, Whisk till very smooth. Set aside.

3. In a heavy medium saucepan, combine the sugar, cream, corn syrup, salt, and water over LOW heat. One the sugar is dissolved, turn the stove to medium or med high. Simmer for approximately 4 minutes, stirring often.

4. Turn off the heat and whisk in the vanilla and butter. Let cool for about 2 minutes. Add melted chocolate mixture. Whisk till smooth.

You had better eat at least a little bit now... even if you're saving it for later! Serve warm. 
Store in fridge. To reheat: microwave on low, stirring several times until smooth and shiny.

Yield: 2 Cups
Recipe Source: Mel's Kitchen Cafe

** For my neighborhood gifts, I doubled the recipe, and then I made it again and tripled the recipe. I poured it into half pint jars. This yielded 18 half pint jars.


  Here's the tag up close:


Print out a few pages of these, and then tie them to the jars with a 
cute little ribbon or twine:

Save to your computer and print. Then write your family name at the bottom... or copy to your computer and type in your family name then print. Here's what ours look like...


Enjoy, and Merry Christmas!
XO,
Nancy
Pin It

Monday, May 13, 2013

Summer School- Math


Here are some fun and easy games for Math.

Greater than, Less than or Equal


Use a calculator especially doing worksheets. 
(I know what you are thinking..... but just think about how often you use a calculator
 for simple math.  It is also good to let them check their work to see if it is right) 
Kids really enjoy using a calculator!


Use a deck of cards and have them add, substract, divide or multiply numbers.
The idea came from The School Bell,  I changed mine so it did not have answer. 
Both ways are great.
Here is a copy of the paper I made.


I got this great clock from Relentlessly Fun, Deceptive Educational
The smaller square one is from My Community Circut Cartridge.

The idea came from First Grade School Box
We did not have dominos so we just used dice so two different ways to play the game.


My girls have always come home at the end of the school year with
workbooks that have some pages they never got too. 
Worksheets can be boring so spice it up.
You can give rewards, time them, let them use a calculator,
work through each problem with them.


  Money: I found the dollar bills at the dollar store and laminated them.  We also use our relish tray to sort out the money.  In the middle are separate pieces of paper with an amount on them.  I have them count the amount on the paper.  Sometimes we will have them use the least amount of coins and bills or see how many ways they can make that amout.  We have also been learning if the price is the amount on the paper and I give you an amount how much change would you give back.
This would have to be my girls favorite activity!!!


For more ideas check out our pinterest board- Summer School
Math can be fun!!!

Jan

Linking to: Southern Lovely Kitchen Meets Girl Someday Crafts
A Glimpse Inside   A Handful of Everything   Link Love Thursday
Redfly Creations   One Artsy Mama 
Family Fun Archives   The Best Blog Recipes   Tidy Mom   Whipperberry   A Peek into my Paradise
Six Sisters' Stuff   Tatertots and Jello 
Pin It

Friday, December 21, 2012

Winter Hat Sugar Cookies

I have a 'thing' for hats this winter season.  They're fun and show individuality and personality. So, I decided to combine two of my favorite things... hats and sugar cookies.

Not only do they make great Christmas cookies, as seen below... they make a fun treat all through the winter by just switching the color (as seen above).


These are made basically the same way as these soccer ball cookies.

If you want to make your own, here's the way.....
First, make your favorite sugar cookie recipe. I love this one by the girls at Our Best Bites.(Double this recipe for 2 dozen winter hat cookies). They hold their shape well, and they taste good. Perfect combination for these cookies... a sturdy sugar cookie is a must. 

Make the cookies at least a day ahead and freeze them. The cold and the time seem to help keep the cookies stay firm and tasty when decorated. Another option is to make them 2 days ahead and just keep them in an airtight container.


The winter hat cookie cutter can be found on Etsy or Ebay.


Make Glace Icing:
1 bag or 2 pounds powdered sugar
1/2 cup + 4 Tablespoons milk
1/2 cup + 4 Tablespoons light corn syrup
4 teaspoons clear extract (such as Wilton brand)
Gel Food coloring

Mix powdered sugar and milk together. Add corn syrup until just combined. Add extracts. Divide and add  food coloring.

*** Make sure to keep this frosting in an airtight container!!!! If not, it will turn into a cement like substance.
However, it takes 8-12 hours to dry completely when it's on the cookie. (Maybe a chemist could explain why, but I can't... I just know what it does :)).


Put icing in a frosting bag with a #3 tip. Outline all the cookies. It works to outline in white and fill in with another color. Or outline with whatever color you will frost the entire cookie. There are endless possibilities:).

Pipe some icing on to the cookie.

Fill in with a smallish and totally clean paintbrush.

They don't have to look perfect....

Let them dry 4-8 hours.


With desired colors and a #2 or #1 tip make designs...

Fill in where you want...


Let them dry for a few minutes before adding other colors.

Painting designs on the cookie also works, as seen on the green cookies pictured above.

Let them dry for at least 8 hours.

Then stack them, or put them in jars or baggies and the frosting will remain as is.


If you make theses, definitely show them off, or take them to a party. Sharing them makes the work and time worth it!

XO,
Nancy

P.S. This is part 3 in a '3 cookie-recipes-in-a-day series. Read part 1 here and part 2 here. Pin It

Pistachio Thumbprints

This is the second part of a 'three-cookie-recipes-in-a-day' series. Click here for part 1 and here for part 3.


Several years ago one of my friends tasted some cookies at a Christmas party. She'd never seen or tasted anything quite like them and she smuggled of few out of the party for me!!! What a friend... thanks, Tammy :). She knows I'm a cookie connoisseur.  I tasted them and just HAD to have the recipe, but she had no idea who made them, what they were called or where to find the recipe.

I went on a quest to figure out how to make them. Through lots of searching and piecing together, I figured that they were called pistachio thumbprints. They are yummy and fun, and not so common... which is nice sometimes during the Christmas cookie fests.

Ingredients:
1 cup butter
1/3 cup sugar
1 egg
1 tsp vanilla extract
3/4 tsp almond extract
1 (3.4 oz) package instant pistachio pudding mix
1/2 cup miniature chocolate chips 2 cups finely chopped pecans (optional)

Filling:
2 Tb. butter, softenend
2  cups powdered sugar
3/4 tsp vanilla extract
1/4 tsp almond extract
2 Tb. milk
A few drops of food coloring (optional)

Glaze:
1/2 cup chocolate chips
2 tsp. shortening

Set oven to 350

For the cookies:
Cream butter and sugar together in a mixing bowl until smooth. Add eggs and extracts. Mix well.

 Combine flour and pudding mix, add to the mixture.

 Stir in mini chocolate chips.

Shape into 1 inch balls and roll in nuts if desired. Make thumbprint in the center of cookie.

 Bake at 350 for 10-12 minutes. Cool on wire rack.

Make filling... cream butter, sugar, vanilla, and milk. Add coloring if desired. Spoon into the center of cookies

Make glaze... melt chocolate chips and shortening. Drizzle over cookies. Let stand until set.


 Share or Eat by yourself.

XO,
Nancy Pin It

Present-Shaped Rice Krispie Treats and a Favorite Tradition


One of my favorite Christmas traditions is an annual cookie and ornament exchange. My friend Melissa invites the same 12 ladies to her house for this party each year. We all bring 12 ornaments and 2 dozen cookies. We give each person 1 of our ornaments and 2 cookies. We all  leave with a collection of ornaments and a bunch of yummy cookies.

Several of us have moved away, and only see each other once a year at this ornament/ cookie party. When we're there, we share ideas, stories, funny things, and recipes with each other. It's definitely one of my favorite Christmas activities. I love this because it gets the Christmas spirit in me no matter what.


This party has resulted in me always looking for cookie recipes and ideas.  Even though rice krispie treats aren't an actual cookie, and the whole world knows the recipe by heart... this is a very simple, quick and fun twist on an oldie but goodie.

Just make a batch of the good old time tested Kellog's Rice Krispie treats:

1/4 cup butter
3 cups mini marshmallows (or 40 big marchmallows)
6 cups rice krispies
cooking spray or butter

Melt the butter on medium low, add the marshmallows. When melted, stir for an additional 30 seconds. Remove from heat, add the rice krispies. Spread in a prepared pan. Let sit 20 minutes. Cut and remove.

Cut ribbon or 'wrapping ribbon' and tie around the rice krispie treats like a present.


Simple, quick, and a fun.

XO,
Nancy

P.S. This is the first of a '3 cookie recipes-in-a-day' series. Be sure to check the other 2 here and here. Pin It

Wednesday, December 19, 2012

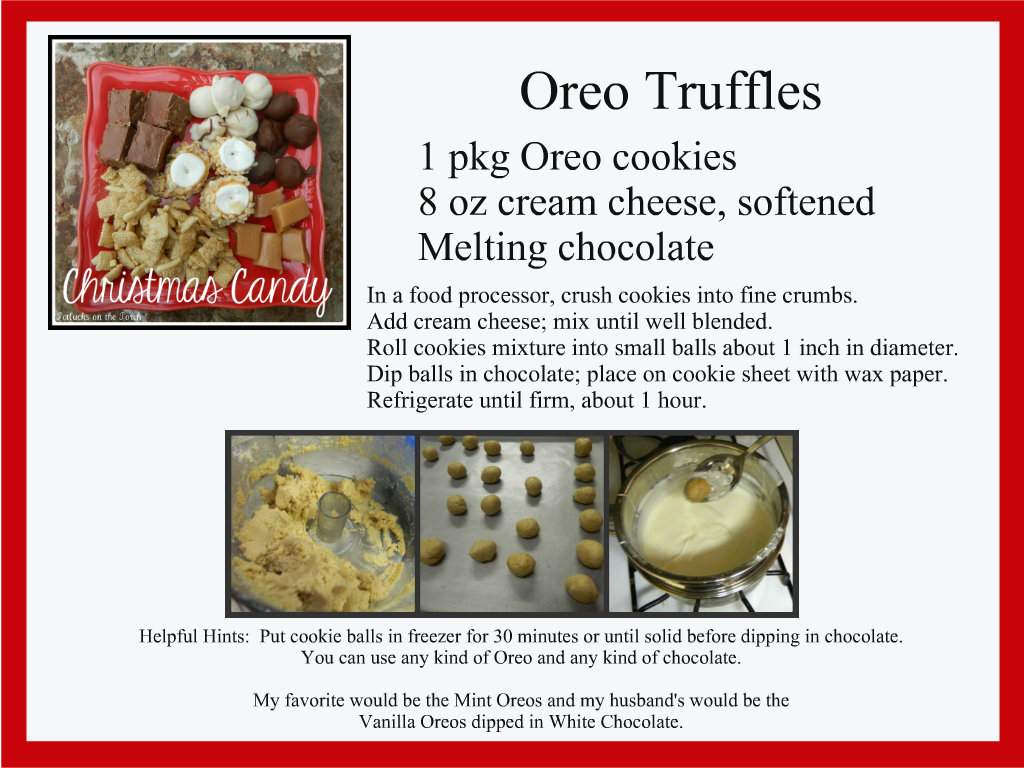
Christmas Candy

I remember being married just four short months when my husband's family Christmas tradition was introduced to me.  I am not sure whether I should thank them or not since it was not my

"heart that grew 3 sizes that day"!


Christmas Candy making is a tradition for many families as is ours.
  I would like to share 5 of our favorite Christmas Candy recipes with you......


A great Neighbor gift as well if it makes it that far! 


Merry Christmas!
Jan
Pin It

Thursday, December 13, 2012

Chocolate Mint Cake Roll... or A Buche de Noel


My husband was looking through a random catalog that came in the mail and found a delectable chocolate mint cake roll. He couldn't take his eyes off of it, and challenged me to figure out how to make one.  I'm never one to turn down a challenge when it comes to a yummy dessert :).

image source
 As I made it, some words to an old song "throw the yule log on Uncle John" kept coming to my head (yes, I am a nerd). I remembered this European tradition with yule logs and cakes.

Anciently, families celebrated the winter solstice or Christmas Eve by finding the biggest log they could. The oldest and youngest member of the family would throw it into the fire. The families would sing and tell stories around the fire, and they would let it burn all night. The embers were supposed to bring joy, love, happiness, and blessings during the next year.


In France however, Napoleon Bonaparte ordered everyone to close their chimneys during winter because he thought cool air was one way of spreading illness. Since the French were forbidden to use the fire place, they made a Buche de Noel to resemble the yule log. It is still a tradition in France to tell stories, sing, and then eat the "yule log" or Buche de Noel. The ones in France are made to resemble a real piece of wood, with meringue mushrooms and all:
Source: Allrecipes.com


My Buche de Noel isn't truly authentic with mushrooms or genoise yellow cake. It isn't exactly branch shaped either, but the mint filling and ganache frosting make up for it!


(Adapted from a Kraft cake roll recipe)
Ingredients:
Cake:
3 squares Baker's semi-sweet Chocolate
6 Tbsp. butter
1 up granulated sugar
4 eggs
1 Cup flour, divided
1/2 tsp baking soda
2/3 cup water
1/4 Cup powdered sugar

Mint Filling:
4 oz. cream cheese
1/2 Cup powdered sugar
1 container Cool Whip
1/4-1/2 tsp peppermint extract
3-5 drops green food coloring

Ganache Frosting:
2 Tb. Corn syrup
6 oz. heavy cream
12 oz. chocolate, chopped (dark or milk, depending on your taste buds)
1/2 tsp vanilla extract
Andes mint chips


Heat over to 350 F.

Start by spraying a cookie sheet. Then put a layer of tinfoil or parchment paper down, and SPRAY IT AGAIN!!


Microwave chocolate squares and butter until melted... check and stir every 30 seconds. Add granulated sugar and mix well.


Beat eggs in a mixer on high for 3 minutes or until thickened (not shown). Blend in chocolate & butter mixture. Add 1/4 cup of the flour and baking soda; beat just until blended. Add remaining flour alternately with the water, beating after each addition.
Spread into prepared pan and bake for 15 minutes or until the top of cake springs back when touched.

Immediately sprinkle 1/4 cup of powdered sugar over cake. (This keeps it from sticking on the next part).

Immediately after that, put a clean towel over the top of the cake....


and turn the pan over, or invert it.

Remove the pan, and then very carefully peel off the tin foil or parchment paper...


The cake will be on that towel. With the cake still on the towel, immediately roll up the cake. Put it on a wire rack and let it cool completely, or almost completely.


Make the mint filling

 (Here's a repeat of the ingredients so you don't have to keep scrolling up and down).
4 oz. cream cheese
1/2 C. powdered sugar
1 package of cool whip
1/4-1/2 tsp peppermint extract
3-5 drops green food coloring

Mix the powdered sugar and cream cheese til blended. Stir in the cool whip, peppermint extract, and green food coloring until blended.


Unroll the cake roll. Spread the mint filling evenly. Carefully roll cake back up.

There will probably be a few cracks like this...

that's okay. The topping will cover it up.

When the cake is rolled, put it seam side down on a platter.

Make the ganache:
2 Tb  corn syrup, 6 Tb heavy cream, 12 oz. chocolate, chopped, 1/2 tsp vanilla extract

On top of double broiler combine corn syrup, chocolate and heavy cream. Cook at medium high heat until melted. Remove, add vanilla. Let cool for a few minutes.
Pour on top of cake roll, add some mint chips. That's it!

Enjoy!
XO,
Nancy

Pin It
Related Posts Plugin for WordPress, Blogger...