Showing posts with label Sewing. Show all posts

Thursday, April 18, 2013

Turn Pants into a Skirt


Do you have a pair of pants that just plain looks good on your "hind end", but are too long, too flared, or full of holes? Here's a solution :). 

Making a skirt out of pants is so easy, and works for ANY size.

If you want to repurpose some of the old pants in your home, here are the simple steps:


Measure at least 2 inches longer than the desired length... to hem, and just to be safe.
Make sure to keep the part that's cut off!! You'll need it later.


This part takes the longest. Watch an episode of your favorite tv show while you do this.


Do this for both the front and back.


Now for the sewing:

Of course, repeat these steps for both the front and back.

Trim off excess length. As seen in the picture above, there is an interesting line in the middle. I had to keep that on to make sure the skirt was long enough, but trimmed most of it off at this part.

Hem: fold under 1/4 inch and iron. Then fold under 1/2 inch. Sew as close to the edge all the way around. ** Note: depending on how the pants are made, you may have to adjust this part to whatever works!

Trim off the extra fabric on the inside of skirt.

Press and you're done!


XO,
~ Nancy

Linking to:
Thursday Favorite Things   Creative Juice   Catch a Glimpse
Redfly Creations One Artsy Mama   Tidy Mom
My Name is Rita   Six Sisters' Stuff  This Gal Cooks  Mad in Crafts  Craft-O-Maniac
Creating my way to Success Upcycle Link Party
Pin It

Tuesday, February 12, 2013

No Slip Headbands


So, I might not be the fittest gal at the gym, but I can certainly be one of the stylish! I was tired of my cheap headbands flipping off my head and hitting the unfortunate soul that was on the treadmill behind me. I noticed a few gals with these great headbands (you know that matched the shoes, that matched their yoga mats, that matched their water bottles...you get the idea). Best yet, they stayed on their heads! So, I shamelessly asked if I could check it out (somehow all pride goes out the door when you are sweaty, stinky and just made a fool of yourself attempting to do a Downward-Facing Tree pose). Anyhow, I thought to myself  "I can make this" so I did.

Here are the simple instructions:

Supplies needed:
- 1/4 yd. of fun ribbon (make sure it is the same width or larger than the Velvet ribbon)
- 1/4 yd. of Velvet ribbon (can be found at most fabric stores). The velvet ribbon is what makes the
   headband stay put when it is on your head.
- 1/2" wide elastic


Step 1: Sew the raw edges of both types of ribbon under.

Step 2: With the wrong side of the ribbons facing each other, sew along the long edges. You'll want to leave the short edges open to slip the elastic in.

Step 3: With the ribbons sewn together, place the headband around your head to see how much elastic you will need. You want the headband to be tight, so cut the elastic so as the headband is shorter than the circumference of your head. This will allow the headband to stretch around your head and stay put. My elastic was roughly 2"-3" long.

Step 4: Slip the elastic into the open slots of the ribbon and sew the seams shut.

Now, if only exercising was this quick and easy!

-Lauralee

*as a side note, I hope that you appreciate my sewing machine from the 70's!

Linking to:
http://www.theshabbycreekcottage.com Pin It

Thursday, January 31, 2013

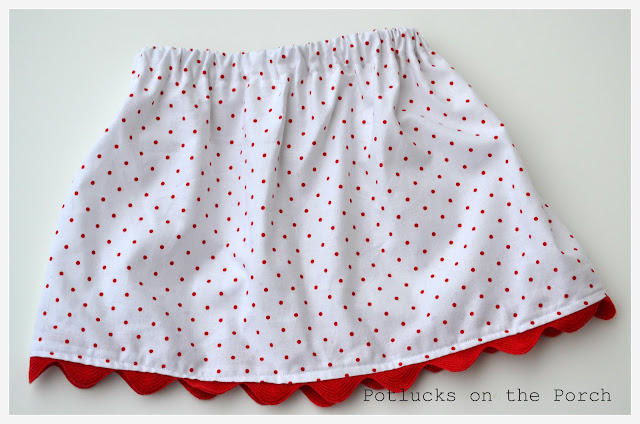
Vintage Sweetheart Skirt... a simple skirt tutorial

As I was in my favorite fabric store a few days ago, I spotted this polka dotted fabric. I'm a total sucker for polka dots. Love. Them. 
Then I saw some jumbo ric rac. Love that too!! Thoughts of valentines day, and vintage pictures swam around my head. These skirts just appeared in my brain. So, I bought the stuff and made them for my twin girls (yes, they are fraternal). Then I made a little ric rac flower pin to accent for a little valentine outfit. But, really they could work for any time.

The thing is, these skirts are so simple. I'll give you the formula, and you can make them for ANY size.
(Ric rac is not essential either).


They're so quick, sew up a few in no time!


Fun for church, or just hanging out...


If you want to make your own..........

Materials:
Fabric, 3/4" elastic, ric rac, sewing machine, pins, coordinating thread, iron
See below to calculate how much of each is needed.

For example: if the waist is 20 inches, and the length is 12" to the knee (or desired length)...
Cut fabric 40" X 14 1/4" (For little girls and babies, one piece of fabric is easy to cut. More fabric can be added and sewn in 2 places instead of 1, if there is not enough fabric for 1 continual piece...ie 2 rectangles).
Cut elastic 19"
Cut ric rac 40"


First, serge or zigzag the top and bottom of the fabric.
Then, with right sides together (so the pretty part is on the inside), pin the side or sides

Sew a 1/2 inch seam down the side or sides


This next step can vary depending on the width of the elastic. I made these skirts with 3/4" elastic, but you can use any size elastic. The only thing you would change with this pattern is adding that much more when you cut the fabric, and folding it that much longer here.

After the 1/2" fold, fold one more time the width of the elastic plus 1/2 inch. So, if the elastic were 1 inch, then I would fold it 1 1/2 inch more. Since my elastic is 3/4", I folded it 1 1/4".  Make sure to press.


After pulling the elastic through, obviously sew the remainder of the casing shut.

Then pin on the ric rac. Make sure to pin it on the right side of the skirt!


All done!
Happy sewing!
~Nancy Pin It

Thursday, January 17, 2013

5 Ways to Celebrate Martin Luther King Day

Everyone's excited for a day off on Monday, right?! It's so nice to have a free day in the middle of the January blahs!! Here are a few ideas to keep Martin Luther King Jr. in mind who we honor this day. Or use the ideas next month as we celebrate Abraham Lincoln and African American history.


1. Embroider Sarah Jane's "On Parade" pattern and make it into a wall hanging, pillow or quilt.


I fell in love with this "On Parade" embroidery pattern by Sarah Jane. It can be purchased at specialty fabric stores, or quilt shops, or on Sarah Jane's web site. (I am not advertising for her, I really truly LOVE her style.)


The kids on parade are several different nationalities. I love how they are celebrating together. It reminds me of the quote by Martin Luther King Jr.... "I have a dream that one day little black boys and little black girls...will be able to join hands with little white boys and little white girls as sisters and brothers." 

 I'm going to hang this wall quilt that I made in my children's playroom on Martin Luther King day as a reminder to be kind, dream big, and stand for freedom and rights, as he did.


2. Make arts and crafts
Many slaves made quilts to tell stories or pass along a secret message though the Underground Railroad. African American art such as ceramics, small drums, wrought-iron figures, basket weaving, and painting have made a major contribution to art of the United States 

The Crafty Crow has a great list of arts and crafts to celebrate Martin Luther King day. Find them HERE.I love this dove made by fingerprints, symbolizing peace.


3.  Quiz Family and Friends


Find the answers at the end of this post. Print this and complete it as a family at dinner time... or some time.


4. Take a Stand for Something You Believe in
Thankfully prejudice and lack of freedom for African Americans is not a huge problem in the United States anymore.  However, there are many other local, national, and global issues which need attention. Many times we don't do anything because we believe that our small part can't make a difference. What would be a better way to honor Martin Luther King Jr. or Abraham Lincoln than to do even your small part to make a difference?

One Idea:

 Did you know that in Afghanistan child marriage is still very common? Girls are pulled out of school for marriages arranged by their families. The girls often have no say in the matter. Her husband's family puts her to work and often punishes her if she does not quickly give birth to a boy. The girls are isolated and powerless. Even though the law now has set a minimum marriage age 16, many families don't want to keep girls in their homes after age 15.  This is because of poverty, tradition, or thinking that it is an easy way to feed their children. (See Central Asia Institute's Journey of Hope Volume VI pgs. 17-18).

 Read more about it in Three Cups of Tea by Greg Mortenson, and Words in the Dust by Trent Reedy.

 Several groups are combating this, and truly making a difference:

Women for Afghan Women
158-24 73rd Ave.
Fresh Meadows, NY 11366
http://womenforafghanwomen.org/

Central Asia Institute
P.O. Box 7209
Bozeman, MT 59771
http://www.ikat.org/   

 Remember that women in the USA were not able to vote until 1920. Here's a way to help other women and girls gain rights. 


5."Live the dream" by doing 100 acts of kindness
 Read Write Think made an awesome chart to make and record 100 acts of kindness. Find the chart HERE. Read more about it HERE.


Some of my greatest heroes are Abraham Lincoln and Martin Luther King Jr. They peacefully worked so hard for peace, equal rights, and freedom for all Americans. Neither of them were able to see a whole lot of results of their work while they were alive, but I am so thankful for what they stood for, and fought for, and how their  influence continues in the world today.

~ Nancy


Answers to the quiz: 1.2. 1865  3. 5  4. 13, 14, 15  5.  Legislation passed by Southern states at the end of the Civil War to control the labor, migration and other activities of newly-freed slaves. This kept most of them in poverty.  6. Newly freed slaves who didn't have money to buy land made deals with landowners to plan crops on their land, and give part of harvest as payment. Many landowners cheated sharecroppers and kept them in poverty.  7. 1954  8. Thurgood Marshall  9. Bus Boycott, Nobel Peace Prize 10.2008


Pin It

Wednesday, January 9, 2013

Personalized Crayon Tote Bag Tutorial

Do you need something to keep your cute little kiddos quiet during church or even for a few minutes at home? Here's a solution...
  I always bring a bag with a few coloring books, crayons, and a few toys to church. Still, there is always at least one fight during the quietest part of the meeting (grrrr). I saw a little girl with her very own little coloring bag the other day.  She seemed so quiet and entertained. I knew that I must make some for my kids. 

 There are several crayon roll and bag tutorials and patterns out there, but this is my spin. They're a perfect size for toddlers and preschoolers to carry. A child's own name, and very own stuff makes them totally excited.


I had so much fun making these, that I couldn't help but whip some up for some nieces and nephews birthdays.

Another variation is with one pouch of crayons in the front and one in the back....


Supplies:
white fabric
embroidery floss or stencils and fabric paint
1 fabric fat quarter for the outside of bag and handles
1/4 yard fabric for lining
1/16 yard fabric for crayon pouches (or 1/4 yard if you want to do the handles with this color as seen above in "Shae")
fusible web... I like "Steam a Seam" which comes in a package pre-cut perfectly for this project
coordinating thread
coloring book and crayons

To Make the Bag
First, personalize the name. Type and print the name on the computer and then trace on to white fabric. Use the back stitch or split stitch... depending on the look you prefer. In the bags above, Abby, Jane and Ezra were stitched with the back stitch. Max and Shae were stitched with the split stitch.  Or make stencils with card stock and a Cricut or Silhouette. Then paint with fabric paint.


Cut all pieces of fabric...
2- 9 1/2" X 12 1/2" rectangles with outer fabric
2- 9 1/2" X 12 1/2" rectangles with lining fabric
2- 2" X 16" Strips with fabric for handles
2- 5 3/4 "X 8 1/2" rectangles for crayon pouches
2 pieces fusible web either from "Steam a Seam" package or cut 2- 9 1/4 X 12 1/4 rectangles
2 pieces of interfacing 3/8" X 16" for handles
trim the embroidered or painted name to the desired size


Lay fusible web on top of one 9 1/2 X 12 1/2 lining rectangles.


Lay the the rectangle for the outer part of the bag on top of fusible web.
Fuse together with iron. Iron both sides on cotton setting until fused together.
Repeat with the other two rectangles.


Zig zag stitch around the edges of the fused rectangles, and the name. Cut also with pinking shears if you want for extra coverage.


Take the 5 3/4 X 8 1/2 rectangles. Fold in half, right sides together. Put a few pins in if you want, and sew 1/4 " seam around the edges, leaving a small space at the end. Turn right side out. Press!!


Decide which piece you want for the front of the bag. Set all piece in desired place and pin.
See proceeding bags for a guide if needed.
** Very Important: Pin the seam end of the crayon pouch on the bottom. It's much prettier and easier to sew each small crayon section if you do this.
Pin each crayon section about 5/8", or wherever the lines or polka dots are on the fabric that can serve a a guide for a straight line. If there is nothing to use as a guide on the fabric, use chalk or a disappearing ink pen and draw straight lines with a ruler.


Sew everything into place. When sewing each individual crayon section, start top stitching at the bottom (where the seam is) and sew to the top. Make sure to back stitch in both places.


Now place the other rectangle on top, right sides together. Pin. Sew 1/4" seam around the sides and bottom of the bag. Go one more time around if you want it to be really sturdy.


Cut a small square out of each bottom side. Then sew a diagonal line as shown below. Trim with pinking shears.


Turn bag right side out. (Not shown).

Now make the handles.


With one 2" X 16" strip, iron both sides in 1/4".

Then fold in half and iron (it's hard to see that this handle has been folded in half and ironed). Put 3/8" X 16" interfacing inside. Fold in half and iron again for reinforcement.

They should look like the ones below. Top stitch down both sides. Repeat with other handle.


Take the bag, turn down the top 1/2 inch to 1 inch (whatever looks best with your fabric). Press!! Sew around edges.

Pin handles where you want them. Sew back and forth into place.


Sew around the top of the bag again making sure to secure handles into place, and to keep the top folded down.

That's it!!


My little girls LOVE them. Even first thing in the morning when the hair's still a rat's nest..

XO,
Nancy

Linking to:
Whipperberry
Tidy Mom
Fingerprints on the Fridge
Tater Tots and Jello
Six Sisters' Stuff
The Real Housewives of Riverton

Pin It
Related Posts Plugin for WordPress, Blogger...