Thursday, December 20, 2012

It's Christmas Time!

I love this time of year! Here are a few things that I find myself taking pleasure in at Christmas time:


A great selection of holiday movies to help you forget about the crowded malls and the 10 lbs you gained solely from fudge and peanut brittle!


The overabundance of ugly sweaters:


Driving around town stalking the Christmas lights!

And most of all, remembering the the Spirit of Christmas!


From my family to yours, I wish you a Merry Christmas!


-Lauralee

Pin It

Wednesday, December 19, 2012

Christmas Candy

I remember being married just four short months when my husband's family Christmas tradition was introduced to me.  I am not sure whether I should thank them or not since it was not my

"heart that grew 3 sizes that day"!


Christmas Candy making is a tradition for many families as is ours.
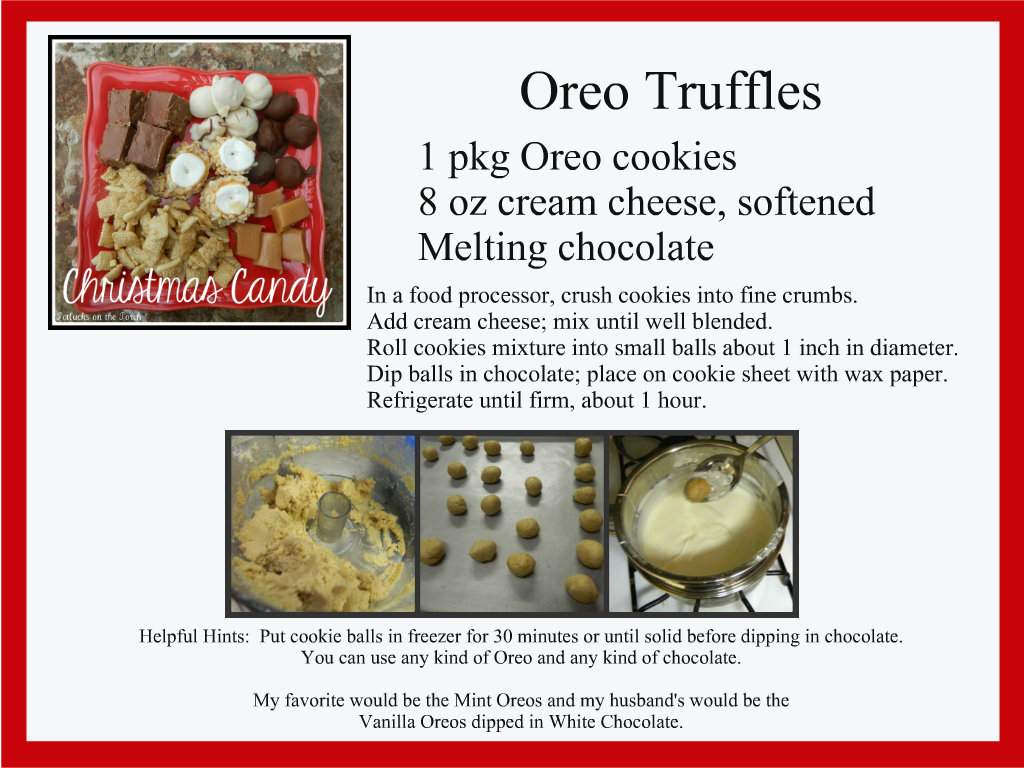
  I would like to share 5 of our favorite Christmas Candy recipes with you......


A great Neighbor gift as well if it makes it that far! 


Merry Christmas!
Jan
Pin It

Tuesday, December 18, 2012

Thievin' Traditions

Hanging out in her favorite outfit
What is Christmas without traditions? Traditions are the sugar and sprinkles that Christmas memories are made of. Sadly, our home is a little tradition-poor when it comes to Christmas. Dare I say, we need a little Christmas right this very minute.

Last week I enjoyed an afternoon chat with my fabulous friend Daphne who told me of one of their traditions where they unwrap one present the night before Christmas and inside is always a pair of pj's. So naturally as the Grinch stole the Who's Christmas right out from their noses, I'm going to steal Daphne's super fun idea. However, I won't be stuffing her tree up the chimney and taking the roast beast from the freezer. Actually maybe the roast beast. She is a good cook.


I think this new tradition will be fun; I'm really excited to start this one. Who doesn't love brand new jammies? There's nothing like that fresh cotton feel before the butt and the knees wear out and the elastic has been dried to brittle in the dryer. Plus, the idea of opening one present before the big day is like a scintillating appetizer before a feast. It just gets you hungrier. Especially if you love opening presents as much as my 32-year-old child does. So here we go, I am headed out to a pajama carrying store near me to start our new tradition. Mmm mmm I love the smell of stolen ideas. Thanks Daphne!

~Maren


Pin It

Christmas Tradition - Ornaments


Each December I start thinking about traditions, and mostly how I would like to come up with some really great ones that my family will cherish forever.We didn't have too many growing up and I always thought it would make Christmas that much more fun if we did. We insisted of course on the common and fun tradition of opening a present on Christmas Eve! We also usually got a new pair of pajamas. My dad did take us each Christmas Eve on a drive to see some of the beautiful Christmas lights around the city which was probably the most important "tradition" that we did each year.

Now that I have my own little family, it is time to begin the memory making. I've had a little bit of a struggle to think of the "perfect" traditions, so I figured that the best way was to take advantage of every fun event, craft, party and idea that came our way and the rest would fall into place! One of those "fall into place" things actually happened the other day as I was sitting on the floor making some ornaments to take to a party. My little girl saw me cutting and gluing and wanted to make her own ornaments. She and I had so much fun doing this together and I got so excited that I had finally found a tradition we can do each year! Since we haven't had our ornament collection going for too long our sparse tree could definitely benefit from this. The great thing about this tradition is that you can do one, or just a few, special ones to save each year or you can give your tree a new theme every Christmas!

The ornaments we did this year, to kick off our new tradition, were these fun little balls made out of paper circles. These are perfect for a house with little kids because they can actually be played with and if they get destroyed nobody gets hurt!

To make these ornaments you will need:


paper of your choice (it can be card stock or normal weight)
a circle hole punch or a good circle pattern and a pencil
craft glue (Elmer's works great)
yarn or string
beads or bells for decoration (optional)


First take your circles and fold them in half. You will want at least 6 per ornament.


Take your string of choice, fold it in half making the loop at the top. Tie a knot in the bottom. This is where you can add a bead or a bell if you want to.


Glue each piece together, half to half.


Before gluing the last pieces together, add some glue to the center and stick your string in the middle.

Now finish by gluing the last two pieces together and hang to dry.


Since these can be made pretty quickly we did a whole bunch so our tree wouldn't feel so naked!

This was so fun to do together, and kids love getting to work with scissors, paper and glue so you can't go wrong with this idea (at least with the young ones)! We are still working on new ideas and traditions so I would love to hear yours!

Merry Christmas! Jenn Pin It

Friday, December 14, 2012

Danish Wedding Cookies


This weekend we have our annual Christmas party with a family we've been friends with our whole lives. This year we decided to do a cookie and ornament exchange so I was going through all the memories I could to try and find a cookie that would be meaningful to share. The memory came to me of a bakery just down the street from our friends and the most beautiful, fun and yummiest cookie ever. My Mom would drop by there just to pick some of these up for us, and being a mom now myself I'm sure that she did it just so she could see the excitement on our faces when she came back to the car with a bag full of these danish wedding cookies! It is probably a good thing that I never realized how easy it is to make these when I was younger or we just may have been eating these every day! They are the perfect cookies to make when you don't have a house full of fancy ingredients but you need a fancy looking treat to impress the crowd.

You will need:

1 cup all purpose flour
1/2 cup butter
1/2 cup confectioners sugar, divided
3 oz cream cheese
1/2 teaspoon vanilla extract
1/2 teaspoon almond extract
1/2 cup pecans, finely chopped

Pre-heat oven to 350 degrees.

With an electric mixer, cream butter and 1/4 cup confectioners sugar in a large mixing bowl. Add cream cheese and mix about 2 minutes until light and fluffy. Mix in vanilla and almond extracts. Fold in flour and pecans.

Roll into 1 inch balls and place on ungreased cookie sheet. Bake 14 - 18 minutes until lightly browned.

Let cool slightly, but while still warm, place one at a time in a plastic ziplock bag with the other 1/4 cup confectioners sugar. Roll around enough to coat and place them back on wire rack to finish cooling.

This is a fairly flexible recipe so if you prefer or only have vanilla extract feel free to use only that or replace almond extract with coconut extract. You can also use walnuts or almonds if you prefer those.

I hope that you love these simple beautiful little cookies as much as I do! They are perfect for a snowy, Christmasy looking treat or any other occasion too!

Have a good weekend and good luck on all your almost last minute Christmas preparations!

-Jenn
Pin It

Thursday, December 13, 2012

Chocolate Mint Cake Roll... or A Buche de Noel


My husband was looking through a random catalog that came in the mail and found a delectable chocolate mint cake roll. He couldn't take his eyes off of it, and challenged me to figure out how to make one.  I'm never one to turn down a challenge when it comes to a yummy dessert :).

image source
 As I made it, some words to an old song "throw the yule log on Uncle John" kept coming to my head (yes, I am a nerd). I remembered this European tradition with yule logs and cakes.

Anciently, families celebrated the winter solstice or Christmas Eve by finding the biggest log they could. The oldest and youngest member of the family would throw it into the fire. The families would sing and tell stories around the fire, and they would let it burn all night. The embers were supposed to bring joy, love, happiness, and blessings during the next year.


In France however, Napoleon Bonaparte ordered everyone to close their chimneys during winter because he thought cool air was one way of spreading illness. Since the French were forbidden to use the fire place, they made a Buche de Noel to resemble the yule log. It is still a tradition in France to tell stories, sing, and then eat the "yule log" or Buche de Noel. The ones in France are made to resemble a real piece of wood, with meringue mushrooms and all:
Source: Allrecipes.com


My Buche de Noel isn't truly authentic with mushrooms or genoise yellow cake. It isn't exactly branch shaped either, but the mint filling and ganache frosting make up for it!


(Adapted from a Kraft cake roll recipe)
Ingredients:
Cake:
3 squares Baker's semi-sweet Chocolate
6 Tbsp. butter
1 up granulated sugar
4 eggs
1 Cup flour, divided
1/2 tsp baking soda
2/3 cup water
1/4 Cup powdered sugar

Mint Filling:
4 oz. cream cheese
1/2 Cup powdered sugar
1 container Cool Whip
1/4-1/2 tsp peppermint extract
3-5 drops green food coloring

Ganache Frosting:
2 Tb. Corn syrup
6 oz. heavy cream
12 oz. chocolate, chopped (dark or milk, depending on your taste buds)
1/2 tsp vanilla extract
Andes mint chips


Heat over to 350 F.

Start by spraying a cookie sheet. Then put a layer of tinfoil or parchment paper down, and SPRAY IT AGAIN!!


Microwave chocolate squares and butter until melted... check and stir every 30 seconds. Add granulated sugar and mix well.


Beat eggs in a mixer on high for 3 minutes or until thickened (not shown). Blend in chocolate & butter mixture. Add 1/4 cup of the flour and baking soda; beat just until blended. Add remaining flour alternately with the water, beating after each addition.
Spread into prepared pan and bake for 15 minutes or until the top of cake springs back when touched.

Immediately sprinkle 1/4 cup of powdered sugar over cake. (This keeps it from sticking on the next part).

Immediately after that, put a clean towel over the top of the cake....


and turn the pan over, or invert it.

Remove the pan, and then very carefully peel off the tin foil or parchment paper...


The cake will be on that towel. With the cake still on the towel, immediately roll up the cake. Put it on a wire rack and let it cool completely, or almost completely.


Make the mint filling

 (Here's a repeat of the ingredients so you don't have to keep scrolling up and down).
4 oz. cream cheese
1/2 C. powdered sugar
1 package of cool whip
1/4-1/2 tsp peppermint extract
3-5 drops green food coloring

Mix the powdered sugar and cream cheese til blended. Stir in the cool whip, peppermint extract, and green food coloring until blended.


Unroll the cake roll. Spread the mint filling evenly. Carefully roll cake back up.

There will probably be a few cracks like this...

that's okay. The topping will cover it up.

When the cake is rolled, put it seam side down on a platter.

Make the ganache:
2 Tb  corn syrup, 6 Tb heavy cream, 12 oz. chocolate, chopped, 1/2 tsp vanilla extract

On top of double broiler combine corn syrup, chocolate and heavy cream. Cook at medium high heat until melted. Remove, add vanilla. Let cool for a few minutes.
Pour on top of cake roll, add some mint chips. That's it!

Enjoy!
XO,
Nancy

Pin It

Tuesday, December 11, 2012

Hand-dipped Chocolates!


Every Christmas my Mother-in-law is up to her elbows in chocolate (literally). So for the past few years I have been trying to learn how to hand-dip chocolate myself. First, so that I can carry on the tradition. Second (and most important), so that I can have access to these nuggets of joy all year round. 

Anywho, I realized halfway into dipping them and being up to my elbows in chocolate, that taking pictures of the process wasn't going to happen. So, sorry you just get recipes and instructions. I realize I probably need to make a video for it all to make sense (maybe a future project).

Here we go:

First off you want to choose one of the following recipes for the center of the chocolates:


Elegant Chocolate Truffles:
1 ½ pounds (abt. 4 ½ C) milk chocolate or white chocolate (I used bakers chips), melted
1 cup whipping cream
1 ½ tsp. of flavored oils, flavored extracts (raspberry, orange, lemon, etc.) or vanilla

1.  Line an 8" square pan with plastic wrap, set aside.
2.  Place melted chocolates in medium bowl. (I melted my chocolates in the microwave. Put in  for 20 seconds, stir and repeat until it is melted.)
3.  Scald cream. Remove from heat and let cool for 5 min.
4.  Stir in extract. (I like to add fruit rind too. For example, If I am doing orange flavor extract, I  will rind about a tablespoon of the orange skin into the chocolate)
5.  Beat chocolate with an electric mixer and then pour in cream all at once and continue beating,  cleaning sides and bottom of the bowl with a rubber scraper until mixture is well blended.
6.  Pour into prepared pan and refrigerate 6 hours until firm.
7.  When ready to dip, scoop out by tspful, shape into balls and dip.


Caramels:
2 C sugar                                                                     3/4 C evaporated milk
1 1/3 C white corn syrup                                             2 C cream (separated)
1/8 tsp. salt                                                                  3 tsp. vanilla
4 T margarine or butter

1.  Place evaporated milk and 1 cup of the cream in a large, heavy pan
2.  Add sugar, corn syrup, and salt
3.  Stirring with a wooden spoon or paddle, bring to boil
4.  Add remaining cream slowly so continues to boil
5. Cook to softball or 238 degrees, stirring constantly
6.  Add butter and vanilla and cook to 248 degrees (firm ball).
7. Pour onto large buttered cookie sheet. DO NOT SCRAPE THE PAN. Just let caramel drip out.
8.  Let cool for a few hours and cut/form into squares.


Fondant for Chocolates (I like this recipe for cherry cordials)
1 C whipping cream                                                     4 1/2 C sugar
1/2 C milk                                                                    1/4 tsp. salt
1/2 C Light corn syrup

1. Place liquids in a heavy pan, add remaining ingredients
2. Stir and cook to 228 degrees (soft ball stage) Stir while it is cooking if you like (but only while it's boiling)
3. Take off of stove and let it cool rapidly, moving as little as possible (or it will sugar).
4. Let it cool to about room temperature.
5. Using a wooden spatula/spoon stir until the fondant thickens. You know you are there when the fondant "breaks" from the spoon when you hold it up and drizzle it.
6. Add coloring and flavoring. Or if making cherry cordials skip this step.
7. Roll into balls to dip (use cornstarch to ease the stickiness to hands and work service)

Now comes the fun part! It is time to dip into the chocolate. But first you will need to choose the right chocolate and temper it.

- You will want to use quality confectioners chocolate (sorry chocolate chips won't do) I find my chocolate at baking supply stores or you can purchase it online at one of my favorite shops www.gygi.com.

- Next you will need to temper your chocolate. This website explains it beautifully! A few helpful tips: milk chocolate is more temperamental than dark, if you warm the chocolate too fast it will cloud up or "bloom". It is edible but not as pretty. Don't allow water to touch the chocolate, again it will cloud the chocolate.

- When your chocolate is ready, grab your centers (they should be at approximately the same temperature as the chocolate). Dip the centers in chocolate and with your CLEAN and DRY hand, pick the chocolate up and roll around in your hand. You want the chocolate to evenly cover. Roll the chocolate to your index and middle finger and let it plop/roll off your fingers (don't force it) onto a lined cookie sheet.

If this sounds complicated or too much work, just buy the brick of chocolate and find a cozy spot and enjoy. I won't judge!

-Lauralee


Pin It
Related Posts Plugin for WordPress, Blogger...